The objective of the User Guide is to provide a step
by step description of the new system flow with various screen prints. Some
screen prints in this user guide may differ.
Refer to
Appendix A – Acronyms when you need an explanation of abbreviations in the user
guide.
The user
must have access to the Internet, the BMV URL, an assigned role that is
associated with current responsibilities and BMV transactions.
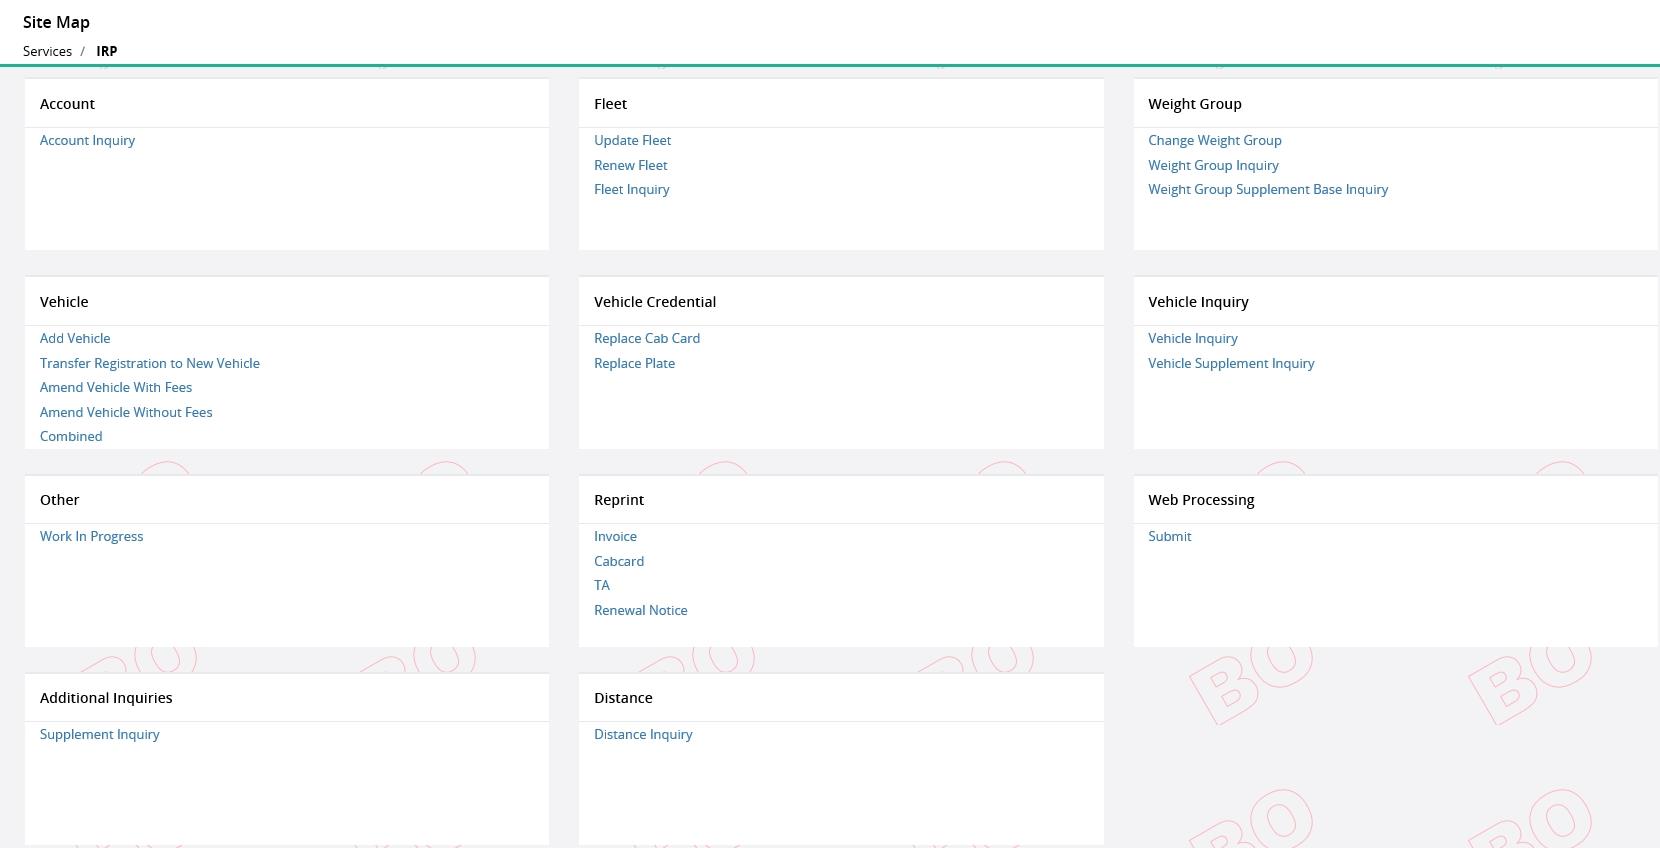
BMV has
several modules/sections in the system which can all be accessed using the
section headers located on the left column of the screen. Some of the section
headers, when selected, will display additional subsections within them. A user
can maneuver easily through the various BMV sections by clicking the section
header icon to expand it and see the available options in that section.
The ENTERPRISE
Level Menu screen is the first screen the external users will see when they
successfully log onto BMV. The applications and corresponding menu options
displayed will depend on the role the user is assigned in BMV.
Below are
the various sections that can be accessed by selecting or expanding the section
headers:
·
Services – This section contains the various applications
available in BMV (depending on a user’s role). Those applications include Enterprise
and IRP
·
Operations – This section contains other system
functions such as Finance which includes various modules like Payment and Reprint; and User
Management which includes modules like User
·
Support – This section contains BMV’s contact information
including address, contact number, email and web address
From the ENTERPRISE
Level of BMV, the user will expand the SERVICES header on the left side of the
screen to select either Enterprise or IRP and the associated menu will display.

For example, selecting IRP from the Services submenu will display the IRP level screen and menu. The menu items displayed depend on the user
role in BMV.
Each BMV module
will have its own menu options which are specific to the application
functionality. After the application is selected, the menu options will
display. The menu options displayed are dependent on the user’s role in BMV.

Some BMV screens
have a search and selection feature. All Inquiry screens have this; however,
some transactions such as “Work In Progress” also have this feature. On the Inquiry screens, the user will enter the search criteria and
a grid will display with the search results. The information in the grid will
differ depending on the object being searched. The user can then select one item
from the grid to view additional detail or select the record for processing.
For
example, on “Work In Progress”, the Account No. is defaulted and disabled. The
user can enter additional information such as Fleet No. and Fleet Expiration
Year and click the Proceed button to get to the supplement screen directly. If
more than one supplement exists for the account, the information grid will
display. Based on the information in the grid, the user can select the
supplement to process by clicking the SELECT icon located on the left of the
supplement line.

Once the
user is processing a transaction/supplement, the tabs at the top of the screen
indicate a transaction’s progress by colors/shading. These tab color indicators
will vary depending on the application and the selected supplement/transaction
within the application.
The tab color
indicator schema is as follows: Tab items in a light blue/green (turquoise)
color (WgtGroup) indicate screens the user has navigated through. The
highlighted tab or in the darker turquoise color (Vehicle) indicates the transaction
step currently being processed. The remaining tabs in a grey color (Billing,
Payment, and Credentials) indicate processing yet to happen. The user may navigate
back to a previous tab by selecting the desired tab. The MAIN MENU and INQUIRIES
tab are there for all transactions.
MAIN MENU
returns the user to the MAIN MENU of the application and INQUIRIES displays a
pop-up screen. The Inquiry screen may be used at any time and does not interrupt
the transaction/supplement being processed.

The
navigation from screen to screen in BMV is performed by selecting push buttons
at the bottom of the screen in the command line. The following five push
buttons are common to most screens in BMV and control the navigation:
PROCEED
– Performs edits on data entered on the screen and if information passes
edits, BMV proceeds to the next screen
CANCEL –
Cancels the transaction/supplement (Backout transaction)
QUIT – User
will exit the transaction; however the transaction is not cancelled. The
transaction can be continued using the WIP feature
REFRESH
– Refreshes the screen (removes all data entered) to look the same way as
when the user entered the screen
“?”
(Encircled question mark) - Displays a pop-up screen with help information
to assist the user in entering the correct information on the screen

Messages
in BMV are displayed at the top of the screen for most transactions. There are
three types of messages: Information, Warning, and Error. Each message type has
an indicator to designate the type of message. Errors will normally prevent the
transaction from continuing; however informational and warning messages will
allow the transactions to continue.
·
“I” – Information messages usually appear in blue font
·
“W” – Warning messages appear with an exclamation mark and are
usually in a yellow hew
·
“E” – Error messages appear in red font
Information:

Warning:

Error:

In BMV, all
data entry screens have a verification screen. The verification screen is
displayed once all the edits are passed for the initial entry screen. Normally
the only push buttons on the verification screen are PROCEED and BACK. PROCEED
saves the information to the database. BACK allows the user to go back and
update the information as required and proceed forward again.
Follow
these steps to do an Inquiry on a Customer:
·
From the Enterprise level menu, select CUSTOMER INQUIRY from the
CUSTOMER menu tile and a new Customer Inquiry pop-up screen will display
·
On the Customer Inquiry screen, the Account No. field will be
populated and disabled. Enter other details such as Legal Name, TIN, USDOT No.,
DBA Name, if required
·
If the user checks the History Check checkbox, the system will
search all history records

·
Select PROCEED to display the results that match the search
criteria
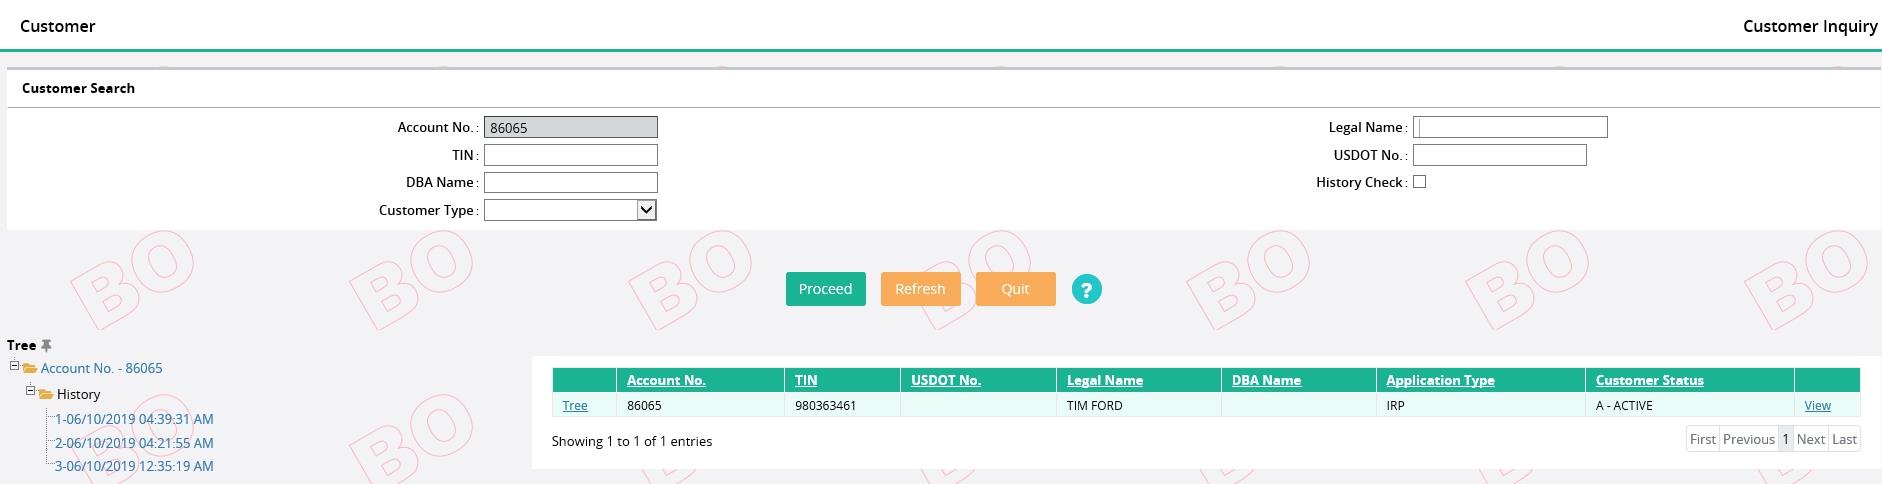
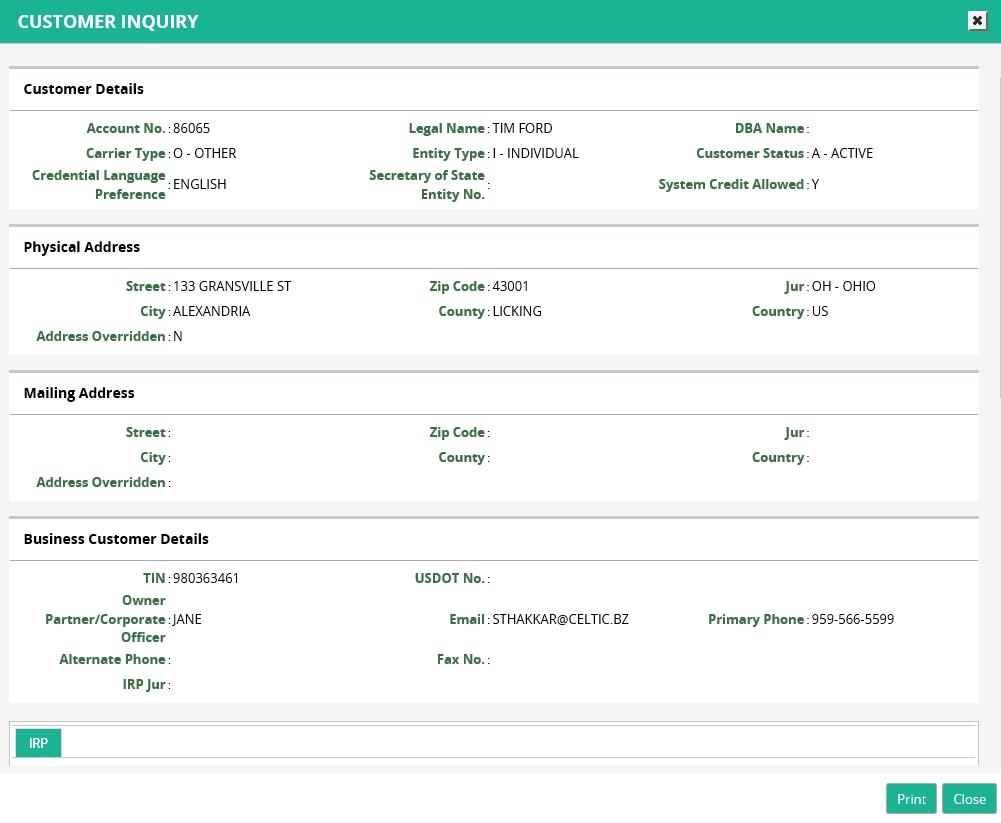
Select the VIEW link
on the far right of the customer entry to display detailed information about
the customer
·
Click the TREE link on the left of the customer result grid to
display the Inquiry tree
·
Any node on the Inquiry tree can be selected for detail
information
·
“+” can be expanded
·
“-“ can be compressed
·
History Check checkbox provides historical information on the
Customer
·
Date and time listed is when the Customer was last updated
1.2.2
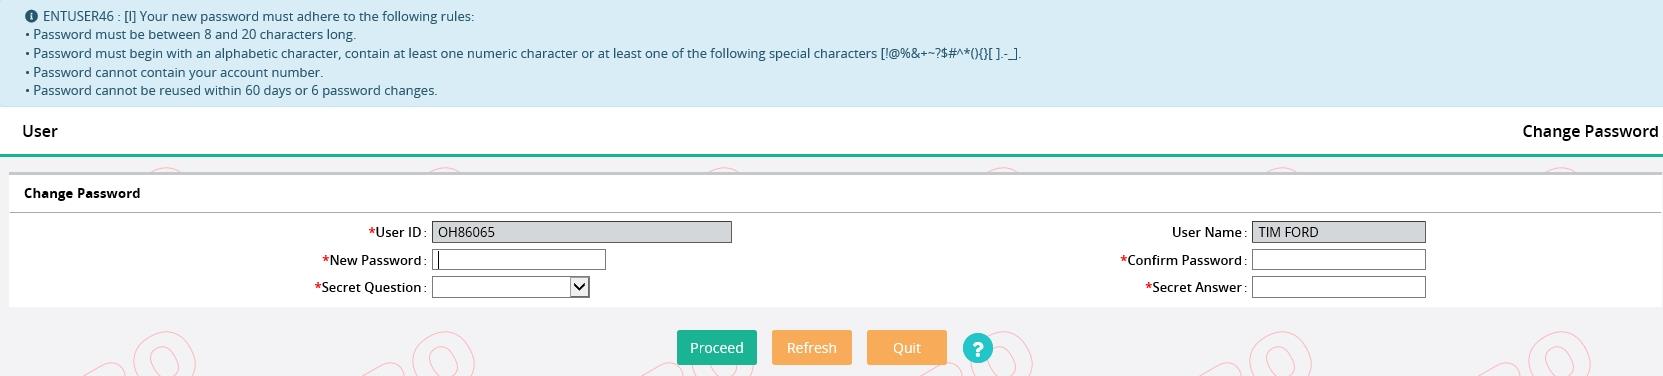
User
Users can
use CHANGE PASSWORD to change their own password. To change a password, do the
following:
·
From the Enterprise level menu, select CHANGE PASSWORD from the
user menu tile
·
The USER ID should pre-populate from the user’s profile, with
editable fields for an Old Password, (New) Password and Confirm Password
·
SECRET QUESTION and SECRET ANSWER are auto-populated from
previous information and can also be changed at this time
- Select
PROCEED once the information is updated to change the password
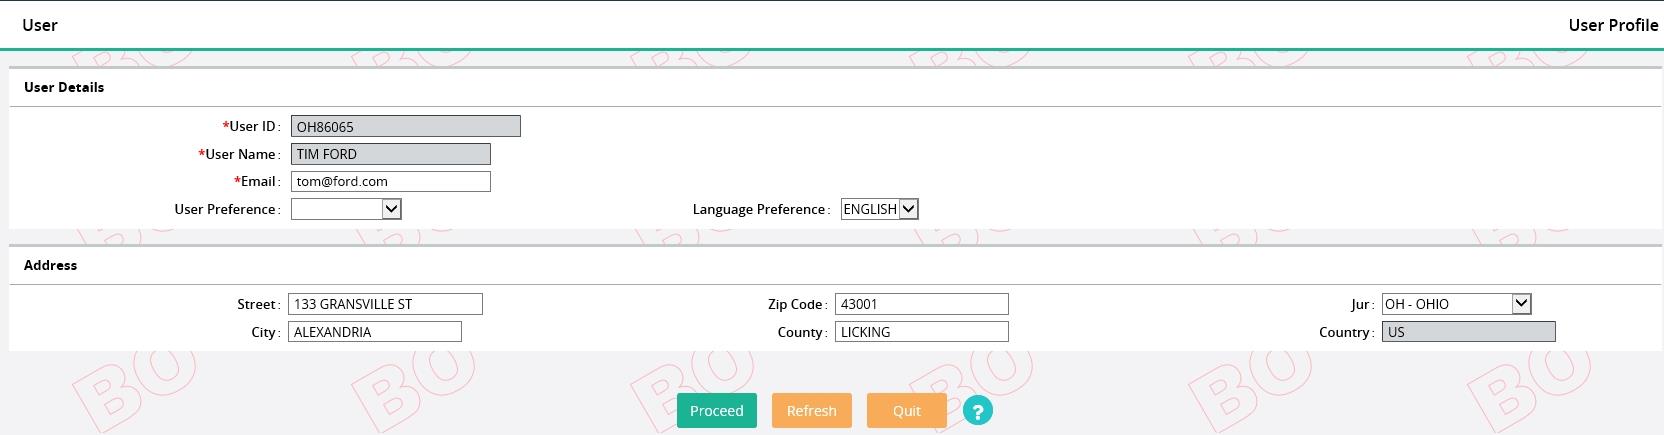
A user can
update their profile using the USER PROFILE option. To update your user
profile, do the following:
·
From the Enterprise level menu, select USER PROFILE from the user
menu tile
·
The User ID field is pre-populated and disabled
·
The Email field is also pre-populated but enabled to allow
changes
·
The Address section will display with information previously
entered and enabled to allow changes
·
Make any appropriate updates and select PROCEED, then select
PROCEED once more from the verification page to apply the changes
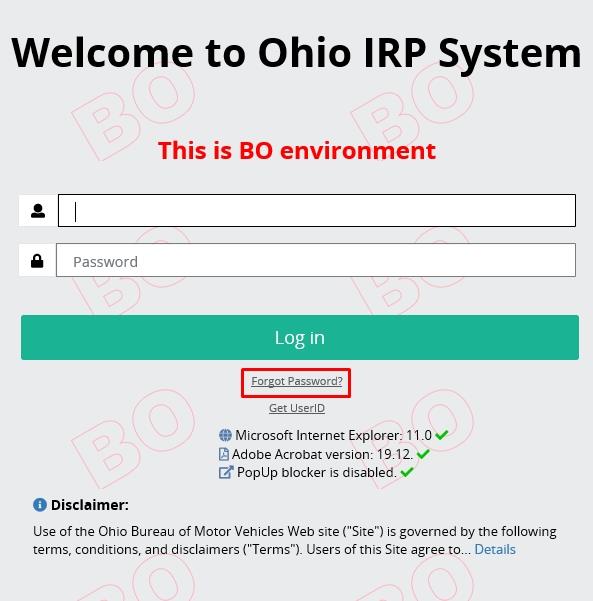
OH allows user to reset password for their account.
To reset the password, the user must click on Forgot Password link from the
Login interface and perform the following steps:
- On clicking the Forgot Password link, the user will be
redirected to a screen displaying User Id, Secret Question and Answer
fields.
- Enter the User ID, and select Secret Question and Answer as
desired. Click Proceed from the command line to perform the edits.
- The system will verify the entered information and display the
Reset Password page where the user can enter and save a new password to
access their account

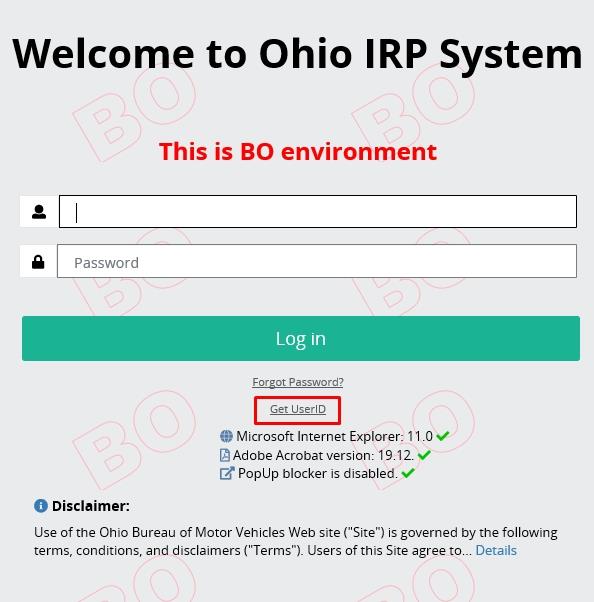
OH allows user to get
their userid if forgotton. To get the userid, the
user must click on Forgot UserID link from the Login interface and perform the
following steps:
- On clicking the Forgot UserID link,
the user will be redirected to a screen displaying TIN, Account No,
Zip Code, Email fields.
- Enter TIN, Account No, Zip Code, Email. Click Proceed from the command line to perform the edits.
- The system will verify the entered information and sent
an email to user with User ID.

1.2.3 Information
This
function verifies the client prerequisites of the system.

Logout will
close current session of user and re-direct to Sign On page.
1.3.1 Finance
Transactions/supplements
are added to a cart for payment. A cart payment can be collected by doing the
following:
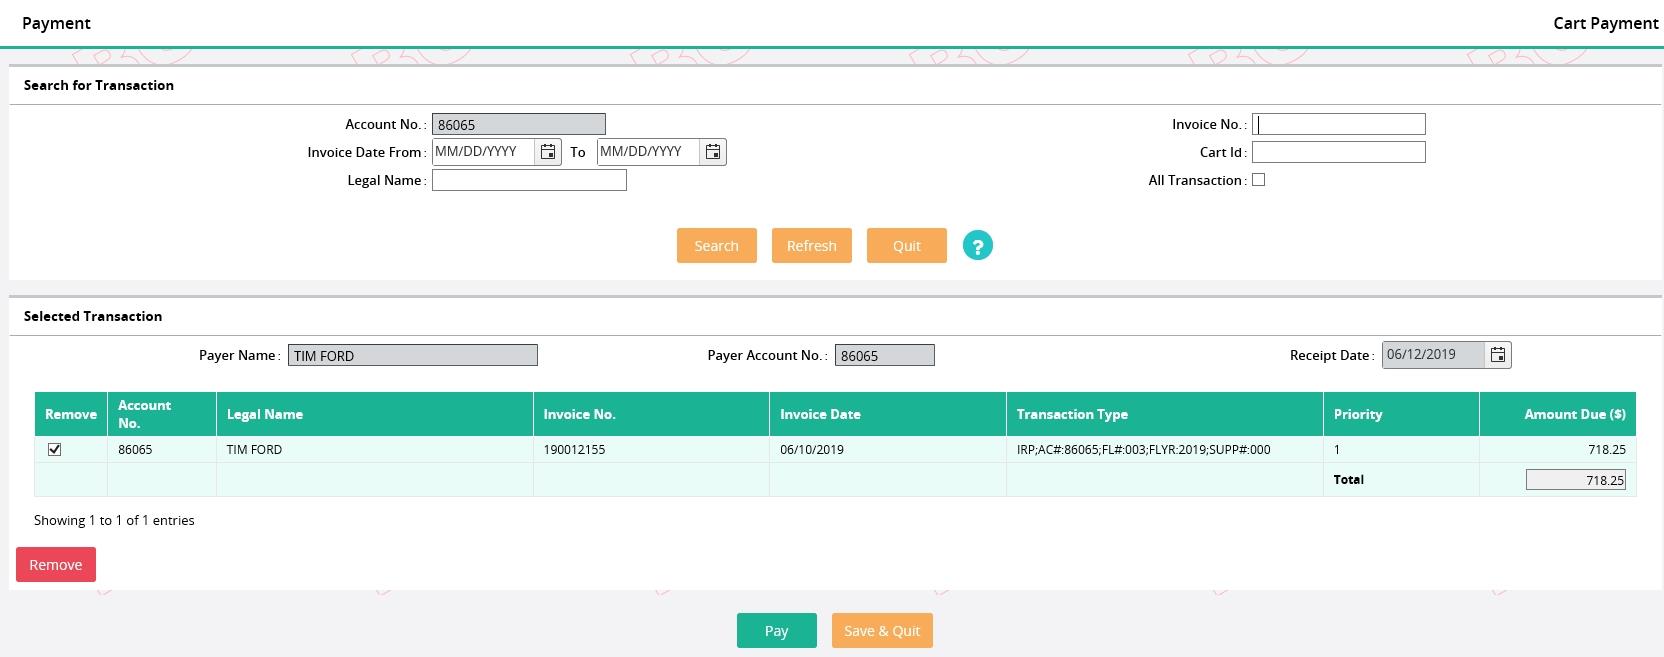
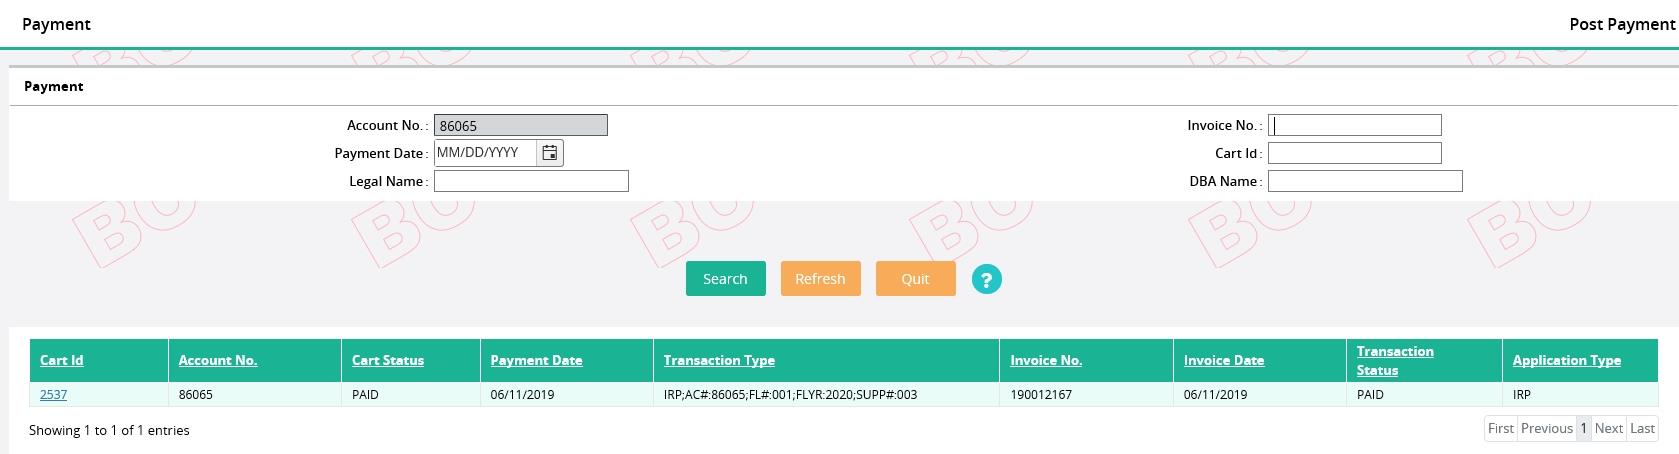
·
From the Finance application level menu under the Operations
header, select CART PAYMENT from the PAYMENT menu tile
·
If a cart exists with added transactions, the cart will be listed
on the screen
·
Otherwise, you can search using the information at the top of the
screen
o Account No. –
defaulted and protected
o Invoice No.
o Invoice Date
From/To
o Cart ID
o Legal Name
o Select SEARCH
to search for carts matching the criteria
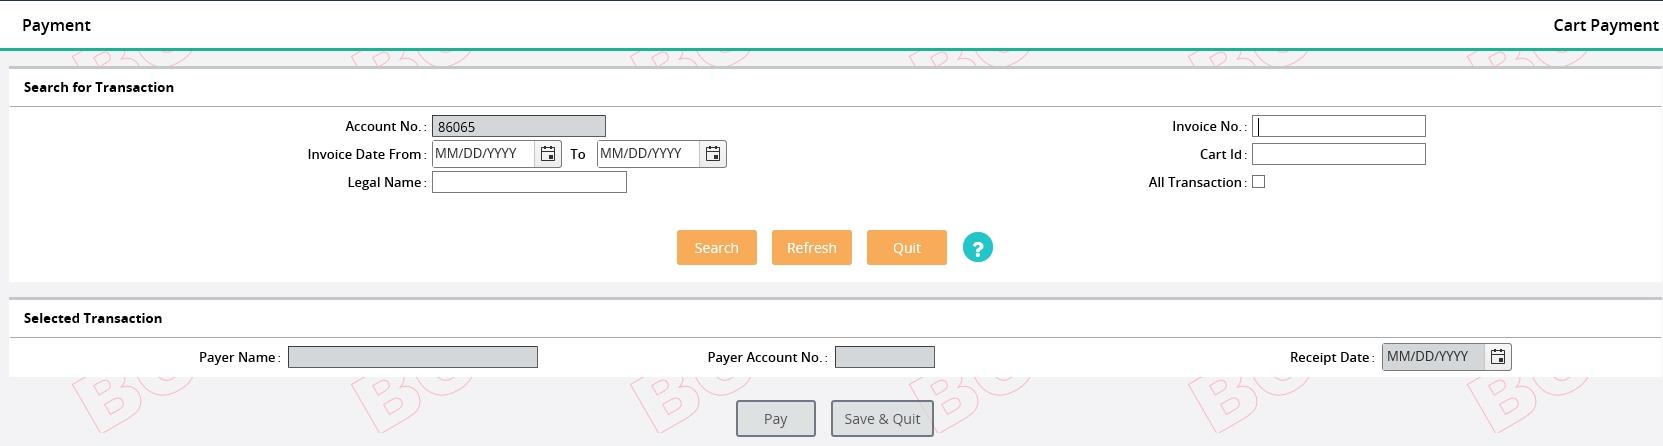
After a cart is selected:
·
To remove a transaction from the cart:
o Select the
check box next to the transaction
o Click the REMOVE
button
·
To continue to add additional transactions to the cart, click the
SAVE & QUIT button
·
Click PAY to perform the edits and display the validation screen
·
BMV displays a shopping cart icon at the top left corner of the
screen to indicate if there is/are transaction(s) in the cart with a value
corresponding to the number of items in a cart
1.3.1.1.1.1
Electronic Payment
To process an Electronic Payment for a
supplement, do the following:
- Click Electronic Payment button from the
Payment Details section on Payment screen
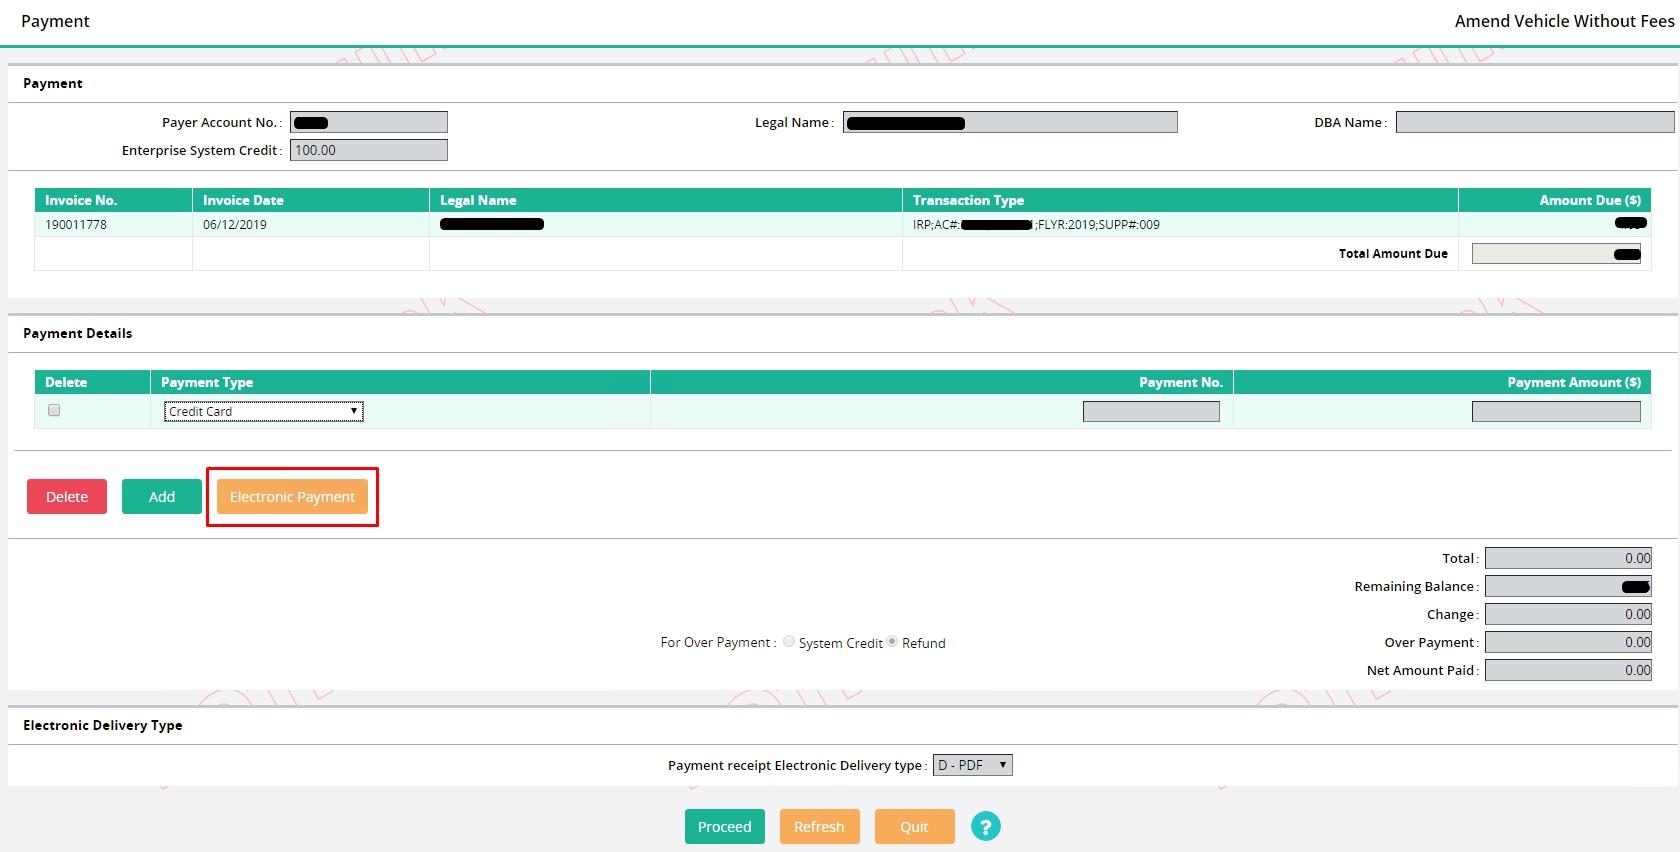
- The system will redirect to a credit card
payment page in a new popup window
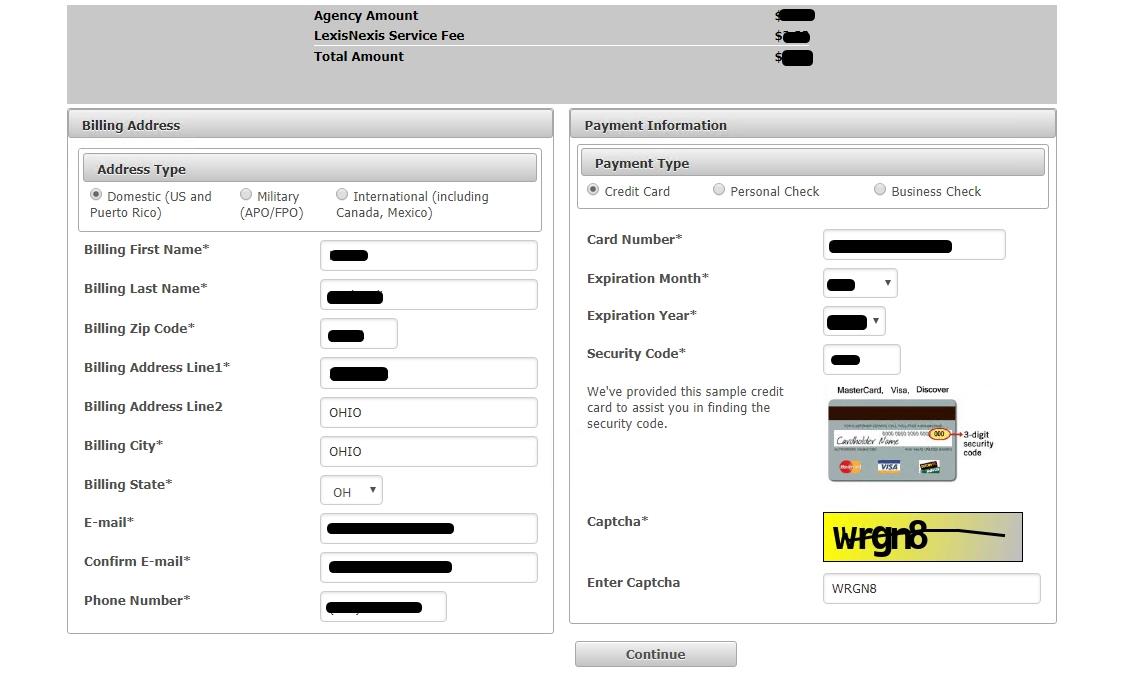
- Enter the address details in Billing
Address section and credit card information in Payment Information section.
There are three payment types available – Credit Card, Personal Check, and
Business Check
- Enter the captcha and click Continue
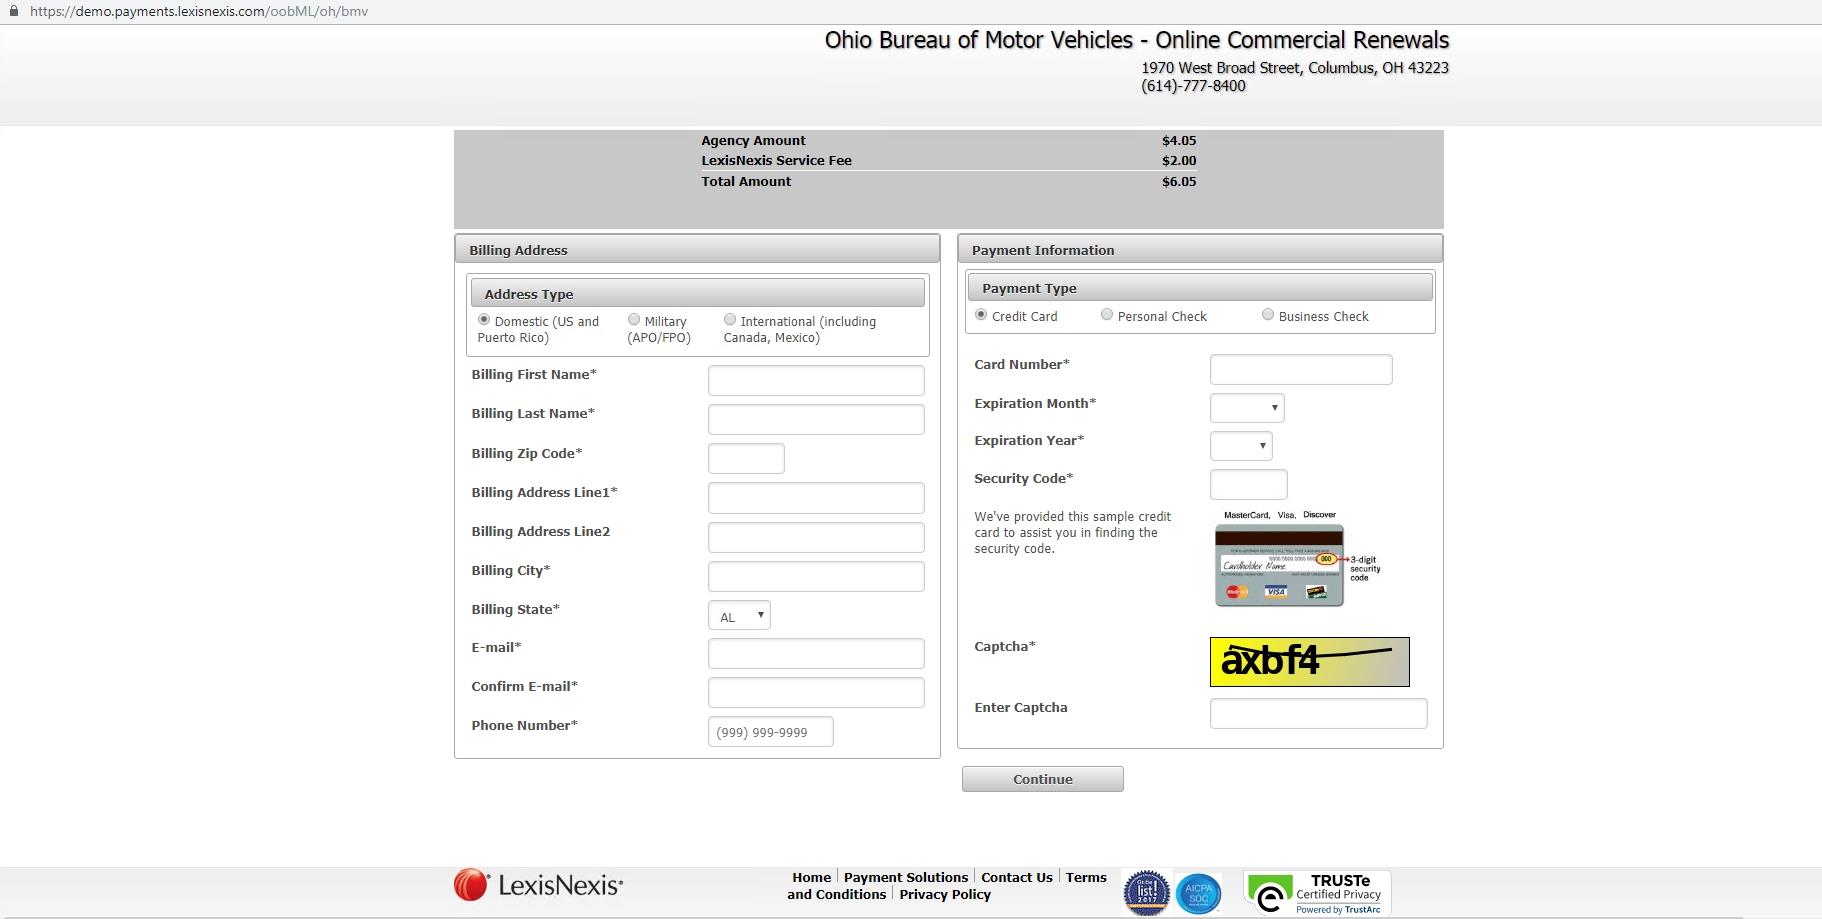
- Verify the billing and payment information.
Click Pay Now to process with payment or Previous Page to go back and edit
the details
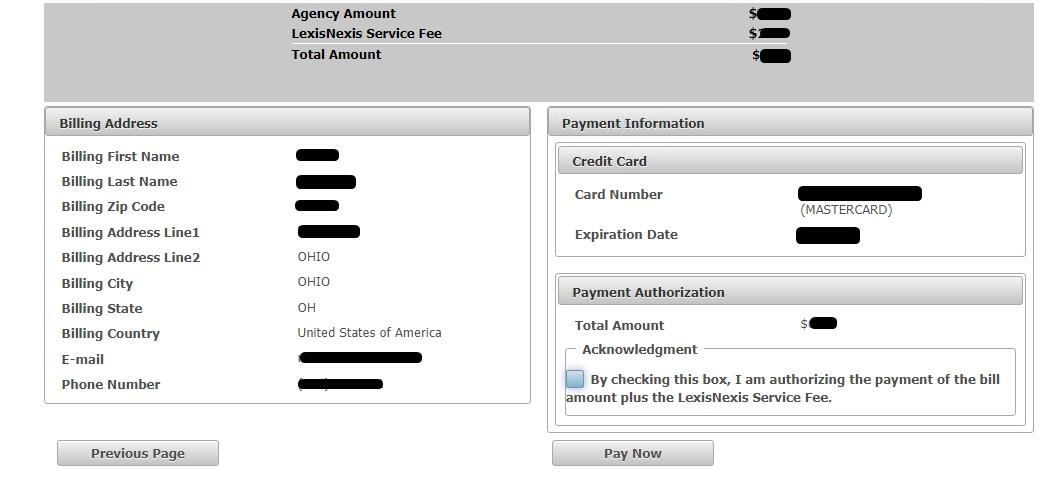
- Click Continue from the verification
screen to generate the payment receipt
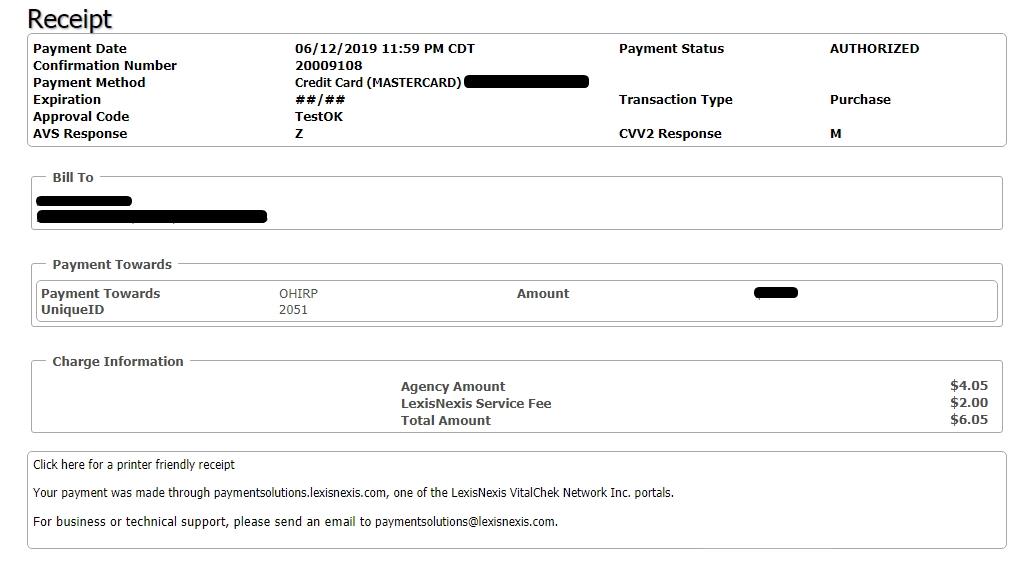
- Close the pop up window to return to the BMV IRP application
- The system populates payment details on the payment screen.
Click Proceed to complete the payment transaction
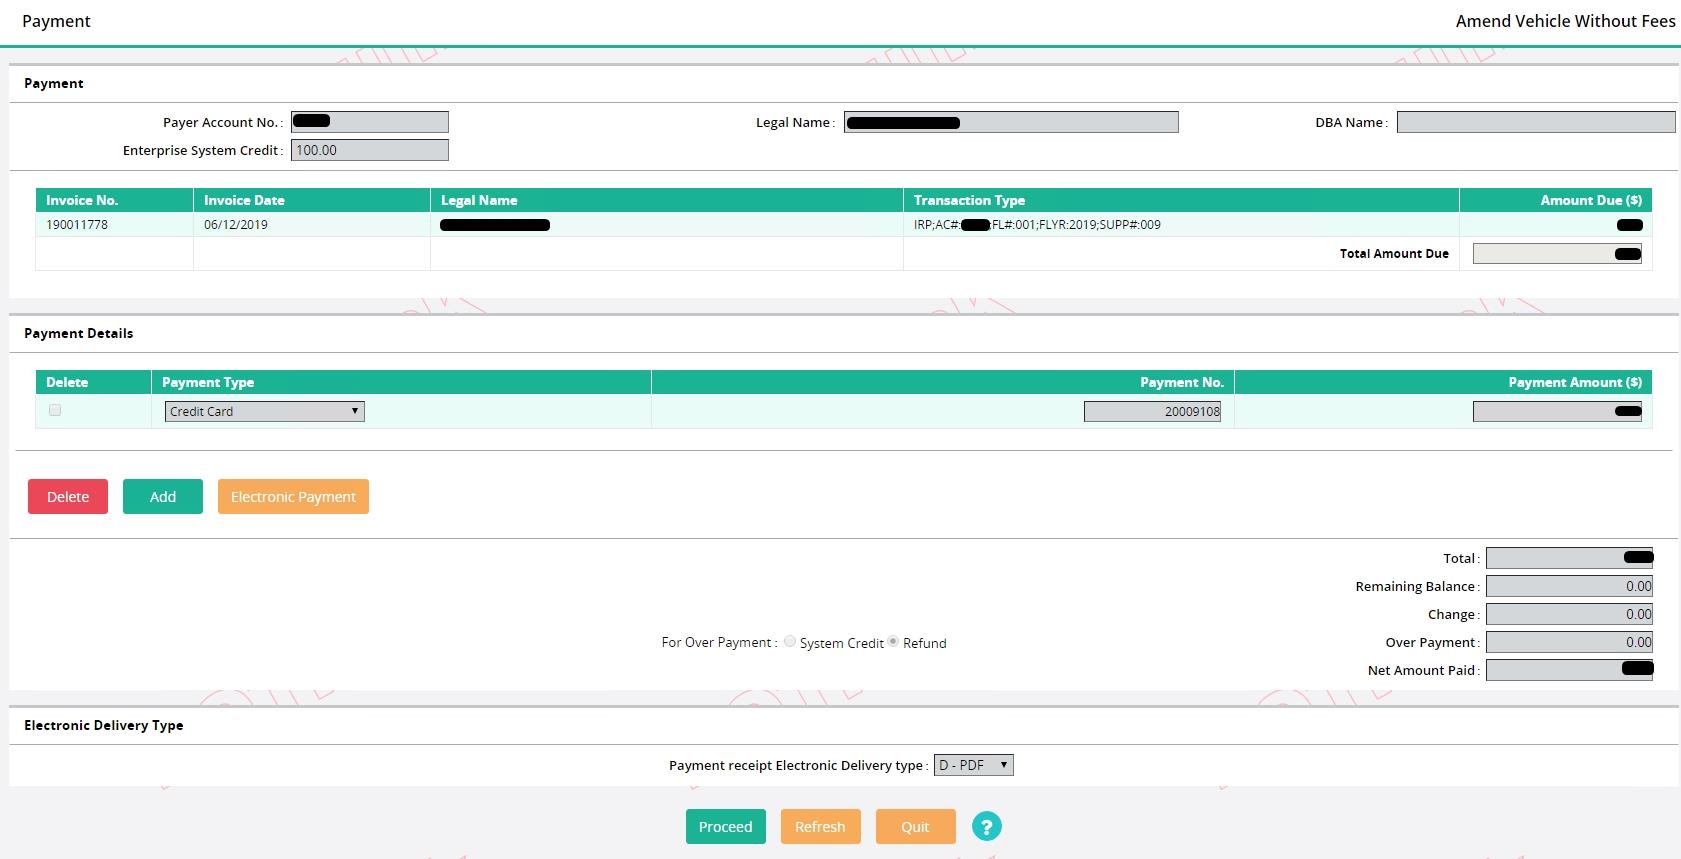
- Click the Apply Payment/Generate Credentials button from the
command line
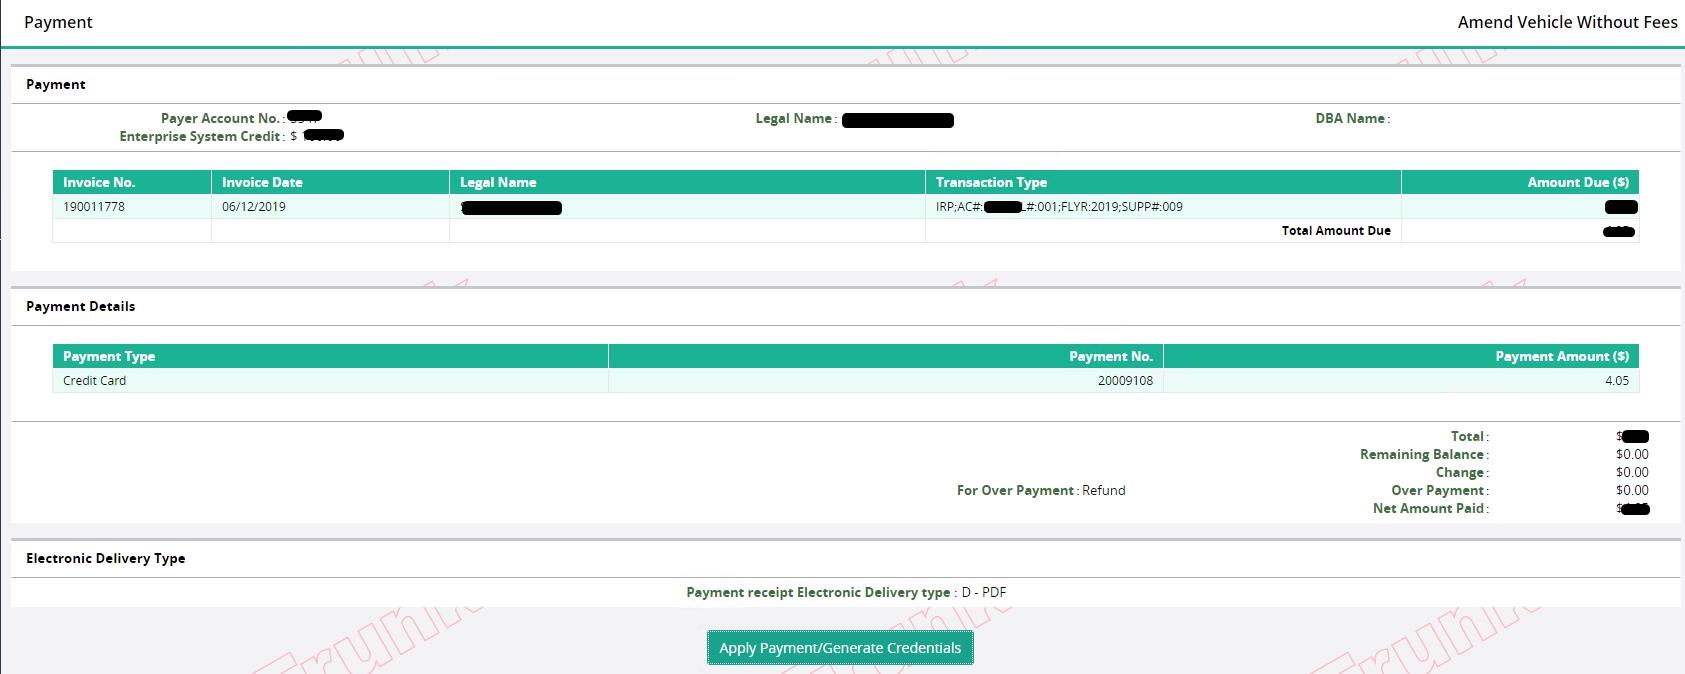
- The system completes the transaction and displays a
success message on the top left of main IRP menu screen

The Post
Payment menu option can be used to continue with credential assignment if
errors occur after payment was collected including inventory issues.

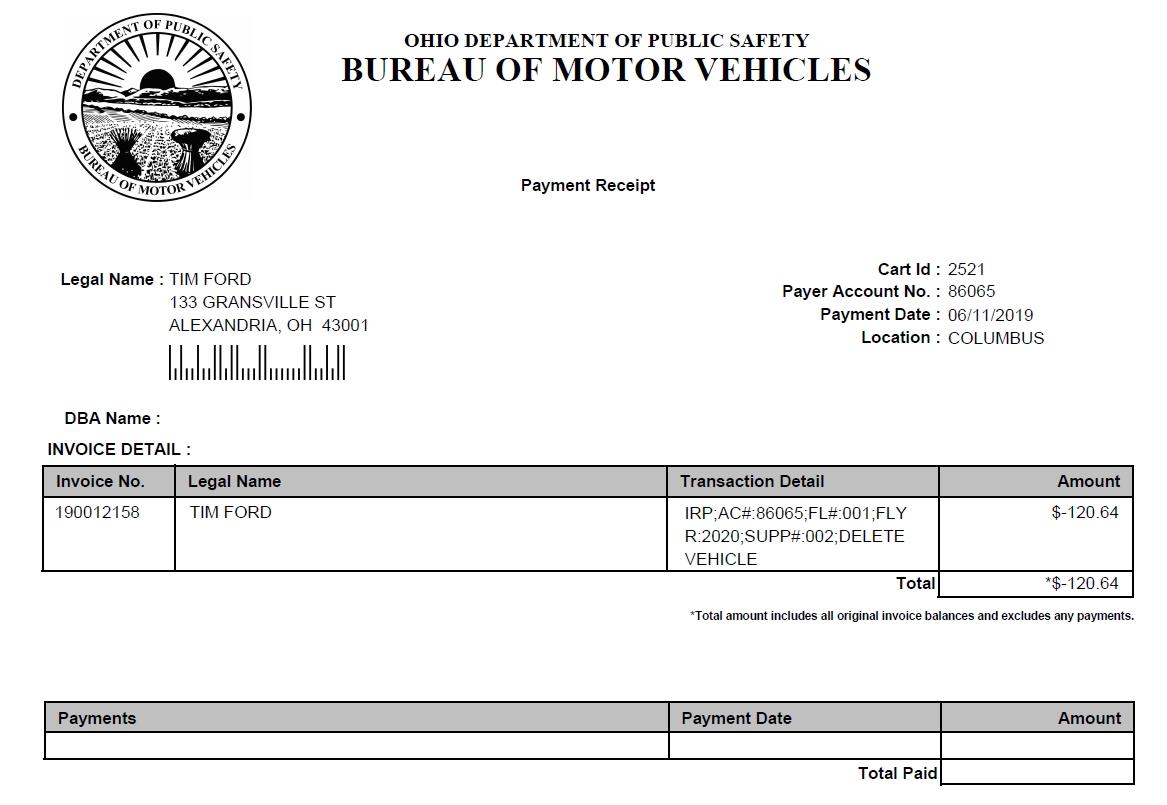
1.3.1.2 Reprint
The Payment
Receipt Reprint option allows a user to reprint a payment receipt already issued/printed.
To view this
information, do the following:
·
From the Finance level menu under the Operations header, select
PAYMENT RECEIPT from the reprint menu tile
·
The Account No. will be defaulted and protected. Enter some minimum
search criteria such as Payment Date to narrow the search results
·
Enter any additional search criteria, if available
·
The Electronic Delivery Type value will be defaulted to PDF and
cannot be changed
·
Select PROCEED

·
A list of records that match the search parameters will appear
·
Click the Cart ID link for the payment receipt to be reprinted
·
The payment receipt which was originally produced will be
generated in the selected electronic delivery type

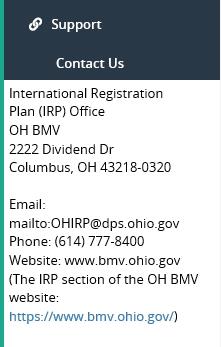
This
sections contains the contact information of BMV.
To view the
contact information, do the following:
- Select
Contact Us option under the Support menu on the left of the screen
- A section
with BMV’ contact details will open up beneath Contact Us menu on the left
- The
information will contain details like BMV’ physical office address, email,
Phone No. and website address
|
URL
|
Uniform
Resource Locator
|
|
IRP
|
International
Registration Plan
|
|
WIP
|
Work In
Progress
|
|
ADMIN
|
Administrator
|
|
TIN
|
Taxpayer
Identification Number
|
|
PDF
|
Portable
Document Format
|
|
CMV
|
Commercial
Motor Vehicle
|
|
AP
|
Account
Payable
|
|
CMCS
|
Celtic
Motor Carrier System
|
|
BMV
|
West
Virginia Motor Carrrier Services
|
|
|
|